Microservices
Shakudo Microservices are non-terminating jobs with an exposed endpoint. Services are only available from within the cluster by default, but can also be reached externally using a JWT (explained below). Services are the best way to make an application available or to enable real-time data processing or streaming applications on Shakudo.
Creating a Microservice
Services can be created from the Shakudo landing page by clicking the "start a service" button.

Alternatively, services can be created from the service page by clicking "create service".
Basic settings
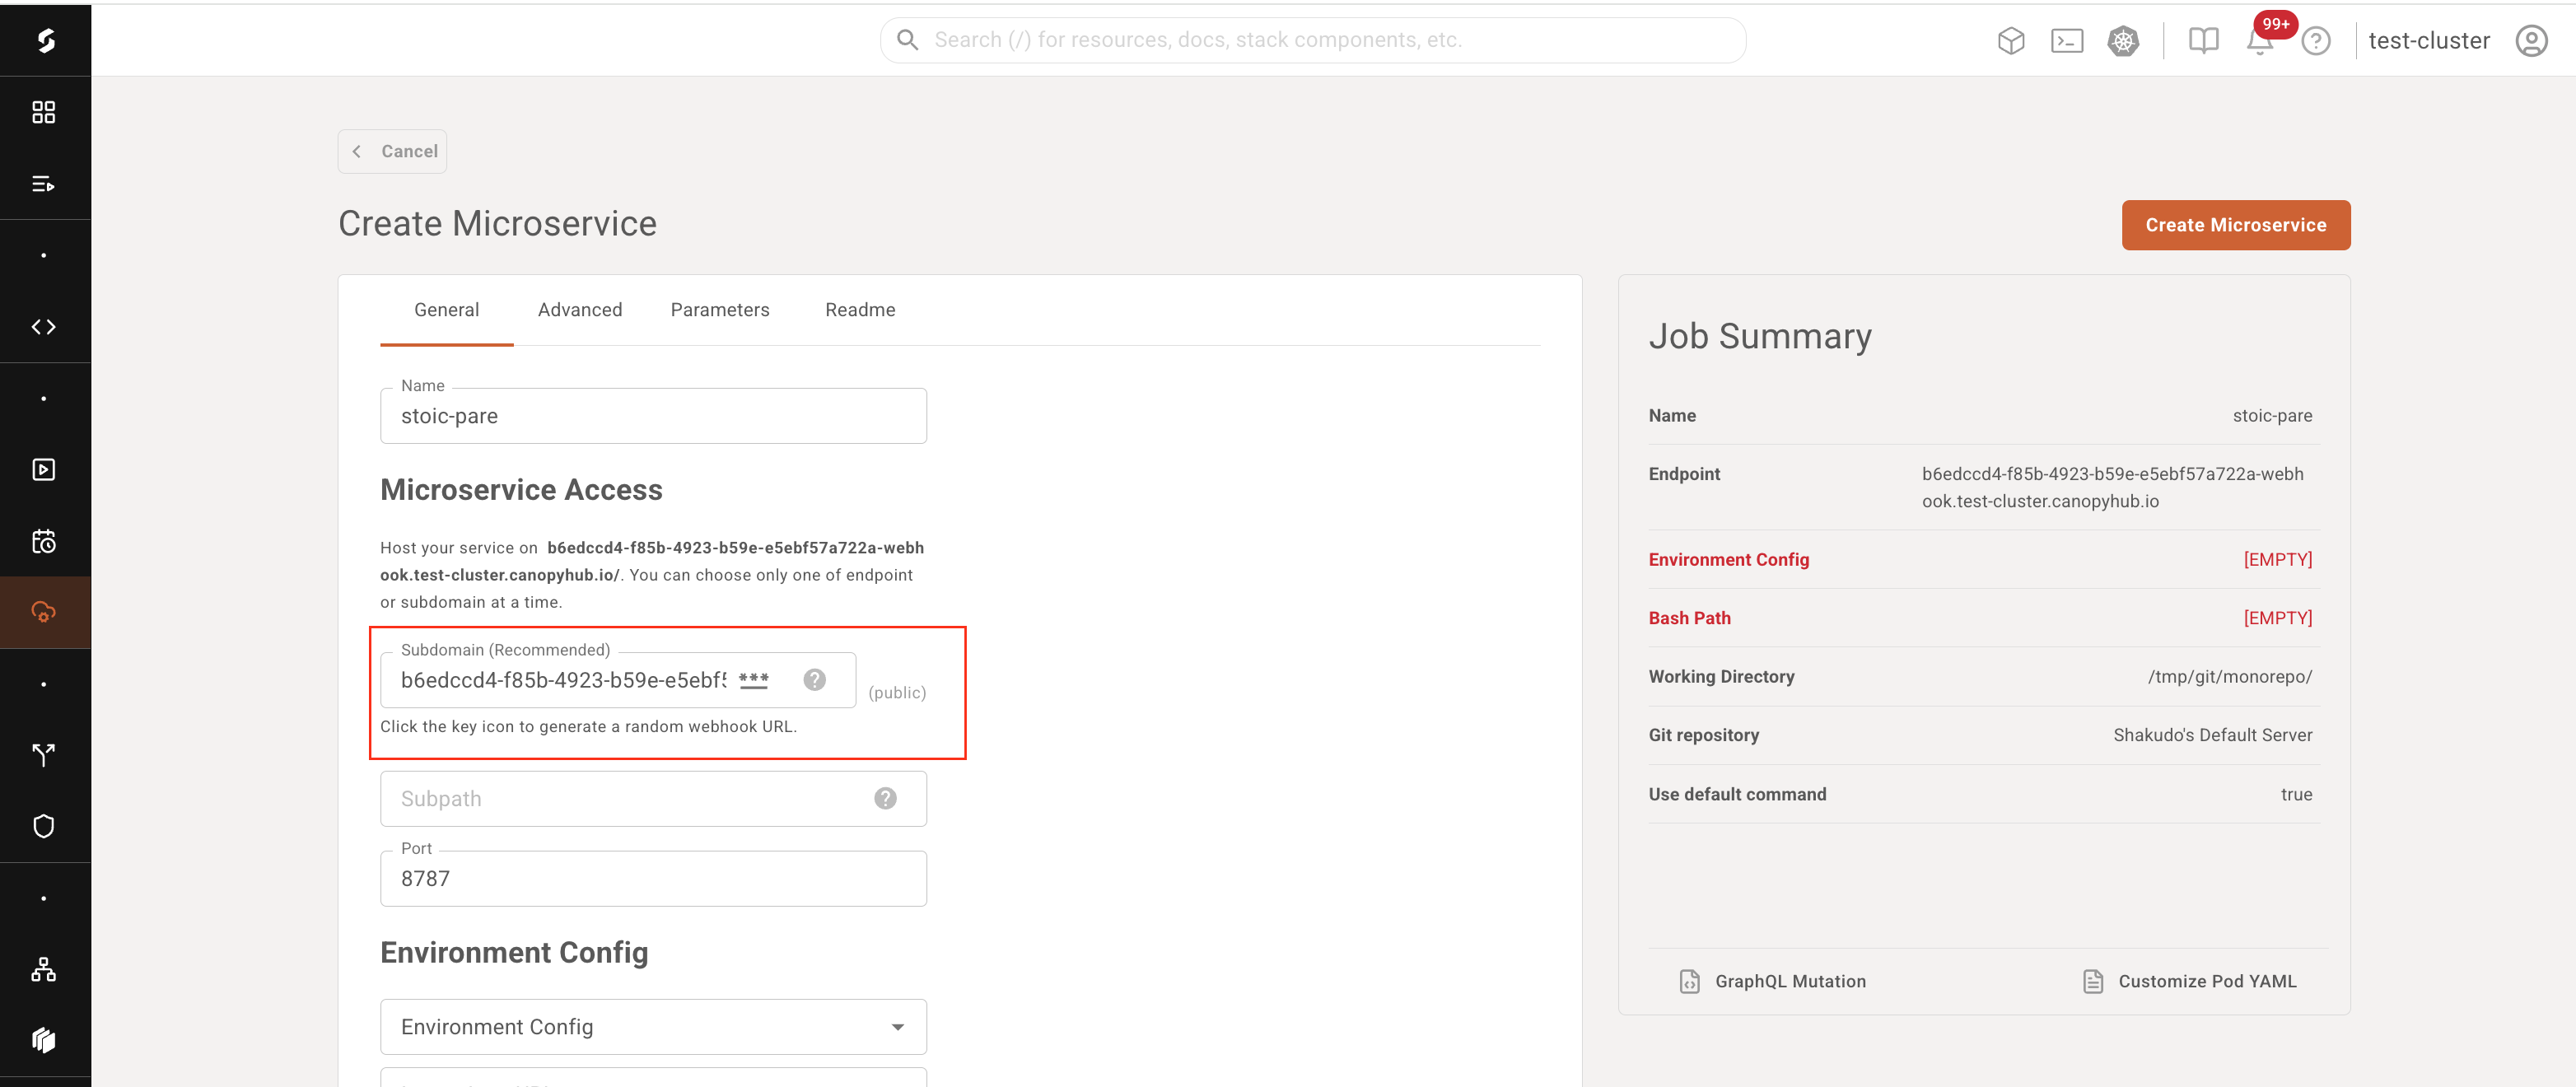
A basic service can be started by simply providing the service name (automatically generated by default), the desired service endpoint, an environment configuration (which work the same way as in Shakudo Sessions), and a path to the service configuration YAML file, relative to the git repository associated with the service (configurable in the advanced tab)
Advanced settings
The advanced tab allows configuring some more advanced service parameters, described in the table below:
| Name | Description |
|---|---|
| Port | Enter a port to expose between 1 and 65535. The default for Shakudo Platform services is port 8787. |
| Min Replicas | Minimum amount of replicas running the service simultaneously |
| Max Replicas | Maximum amount of replicas running the service simultaneously |
| Git repository | The git repository associated with the service |
| Branch | Git branch name for the service |
| Commit | Git commit ID hash to use for the service |
The git repository, branch and commit will be used to clone a project into the service environment, and the service YAML will be located and run from the root of the cloned project.
Additional arbitrary parameters for the service runner configuration can be set in the Parameters tab.
Parameters
Similarly to Jobs, you can add Parameters to inject some additional information, which you can use in your code. When you attach Parameters, they will be available as environment variables, in upper case, with all non-alphanumeric characters replaced by _. For example, if you add an parameter with name "model-name", it will be accessible as the MODEL_NAME in the Service's environment variables.
To maintain backward compatibility with legacy services, Parameters are also available with the HYPERPLANE_JOB_PARAMETER_. Using the example above, this would be HYPERPLANE_JOB_PARAMETER_MODEL_NAME.
Note that these values are stored in plain text, it's recommended that you use Secrets for API keys, keyfile strings, access credentials, and other secret values.
Secrets
When you attach Secrets, they will be available both as environment variables and as a file.
In the case of environment variable, the secret key will be converted to upper case, with all non-alphanumeric characters replaced by _, and prefixed with HYPERPLANE_CUSTOM_SECRET_KEY_. For example, if you add an parameter with name "openai-key", it will be accessible as the HYPERPLANE_CUSTOM_SECRET_KEY_OPENAI_KEY in the Service's environment variables.
Secrets are available as files, in the format of /etc/hyperplane/secrets/{secret_name}/{secret_key}.
Starting with a bash script
If you only need to run a single step consisting of a bash script to start your app, select "Shell" instead of "Multi-step" in the Job creation dialogue.
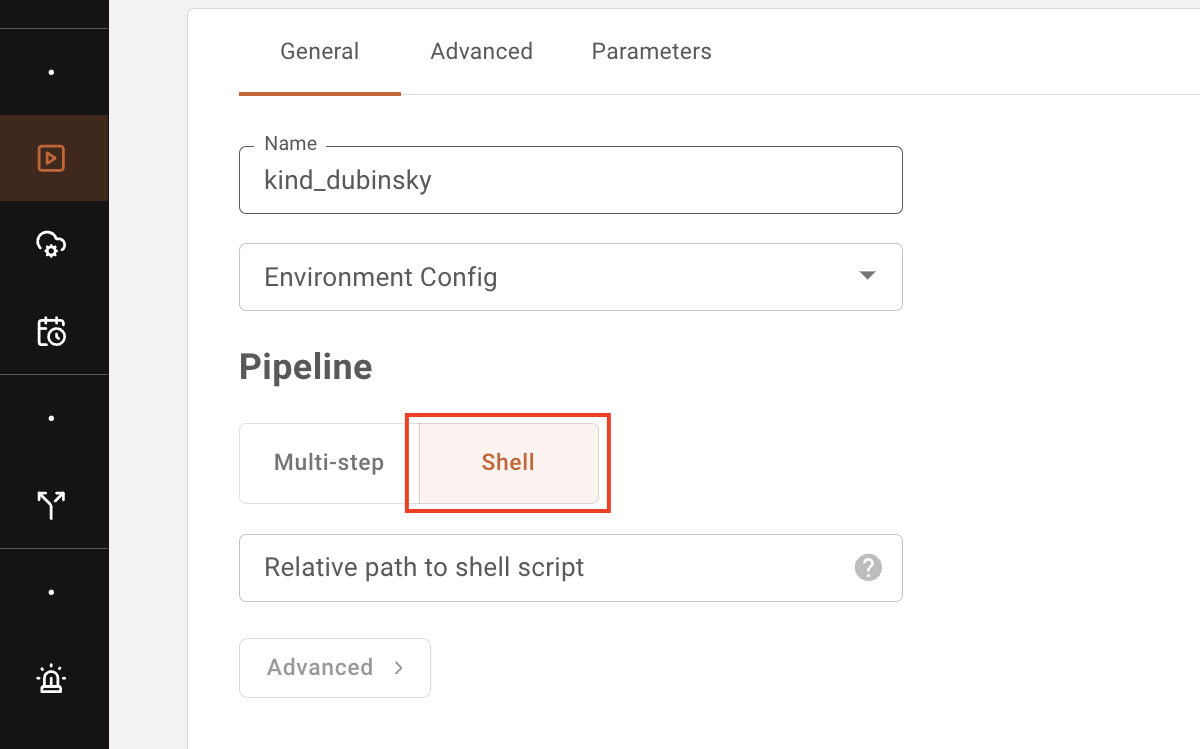
As you would for multi-step pipeline YAMLs, specify the path to the bash script relative to the root of your git repo.
An example bash script might look like the following:
#!/bin/bash
set -e
PROJECT_DIR="$(cd -P "$(dirname "${BASH_SOURCE[0]}")" && pwd)"

cd "$PROJECT_DIR"

pip install foo-package==bar-version
python ./app.py
Note the shebang for bash. The -e flag detects errors in the currently running script, and stops the script when one of the commands within returns a non-zero status. PROJECT_DIR finds the current directory of the current bash script. It is useful when you want to reference things relative to the current bash script.
This bash script will start your Microservice (e.g. a Flask app) and run until app.py exits with an error. In the case of an error, the pod will be restarted and the script will rerun from the top.
Subdomains and exposing endpoints
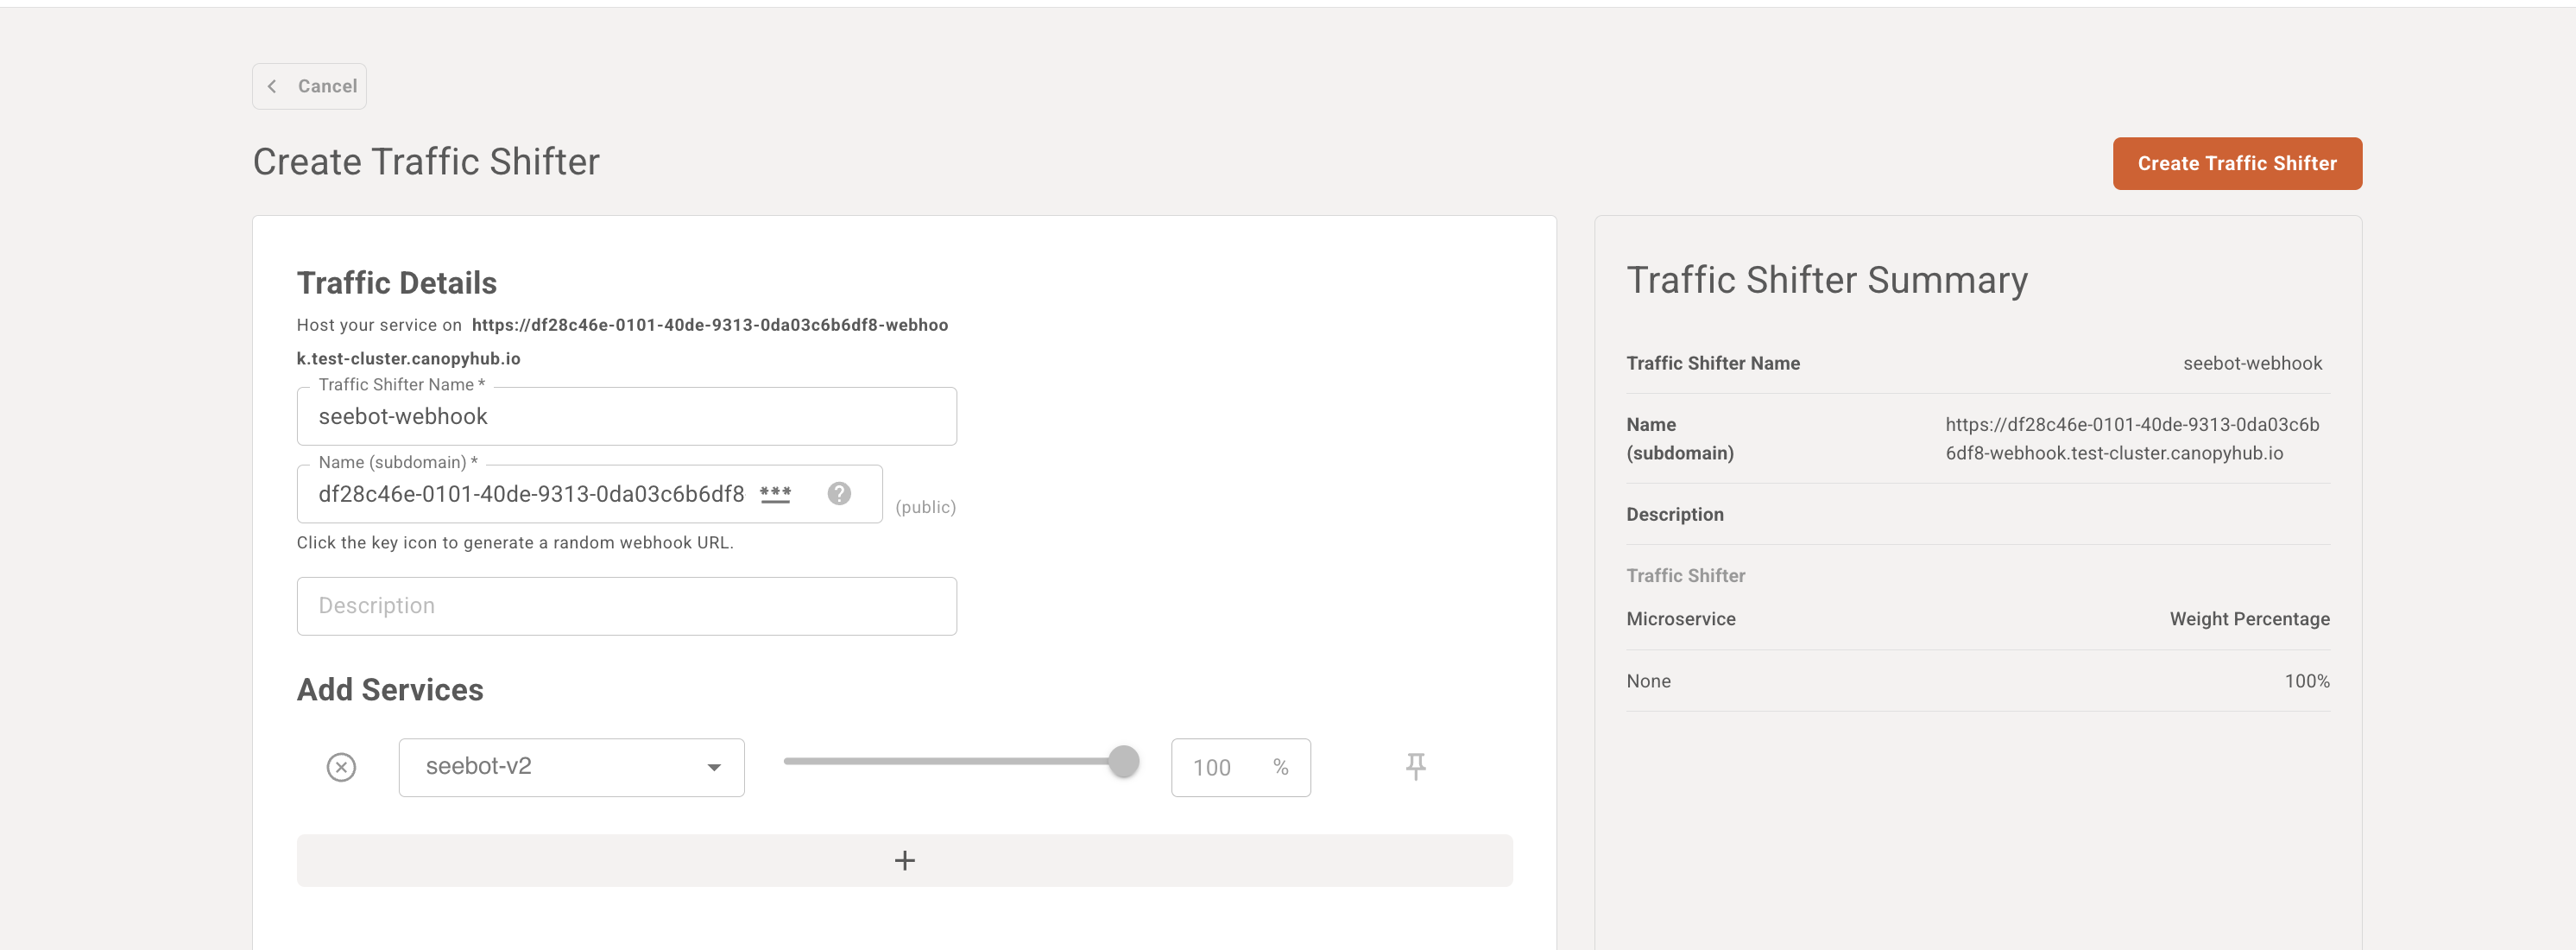
The recommended approach is to use Subdomains rather than sub-paths for each application. In versions of Shakudo 3.47.0 and later, Microservices with subdomains that end in "-public" or "-webhook" will be publicly exposed to users who are not logged in, acting as webhooks. We recommend using our random URL generator to protect your webhooks endpoints.
If you already have a running service and would like to open up a separate URL, you can use the Traffic Shifter to create a webhook for an existing Microservice.
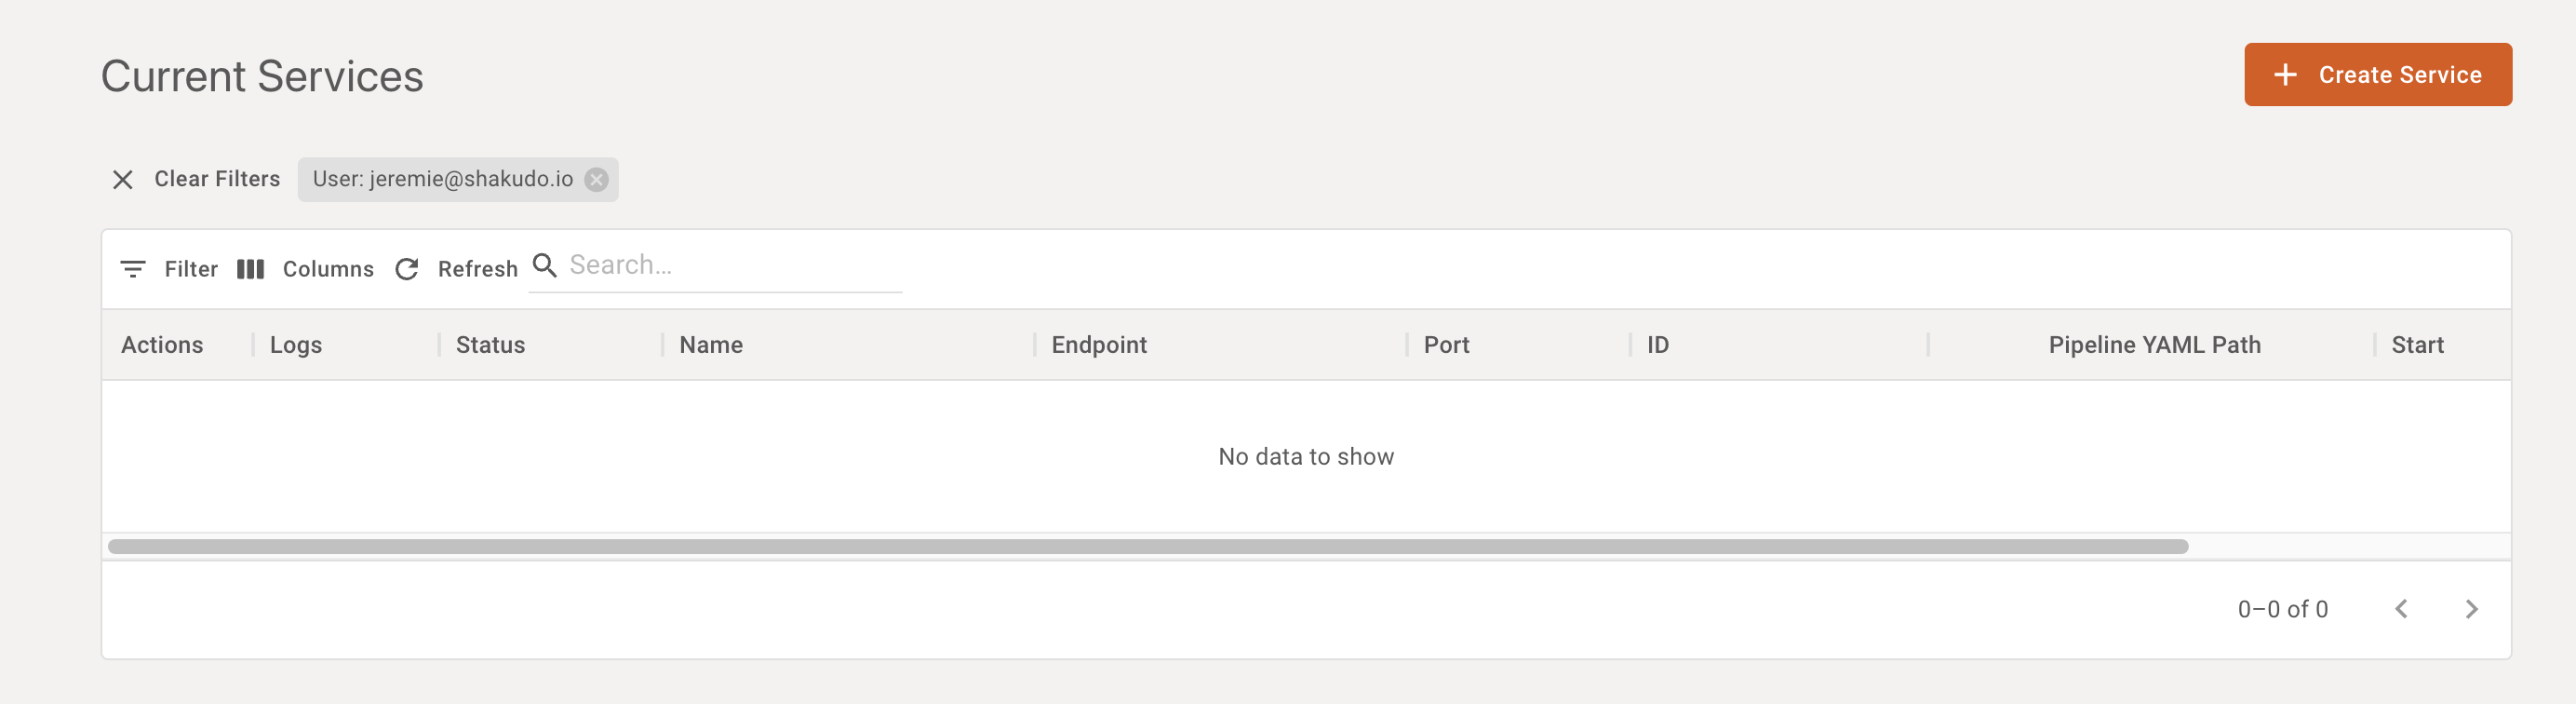
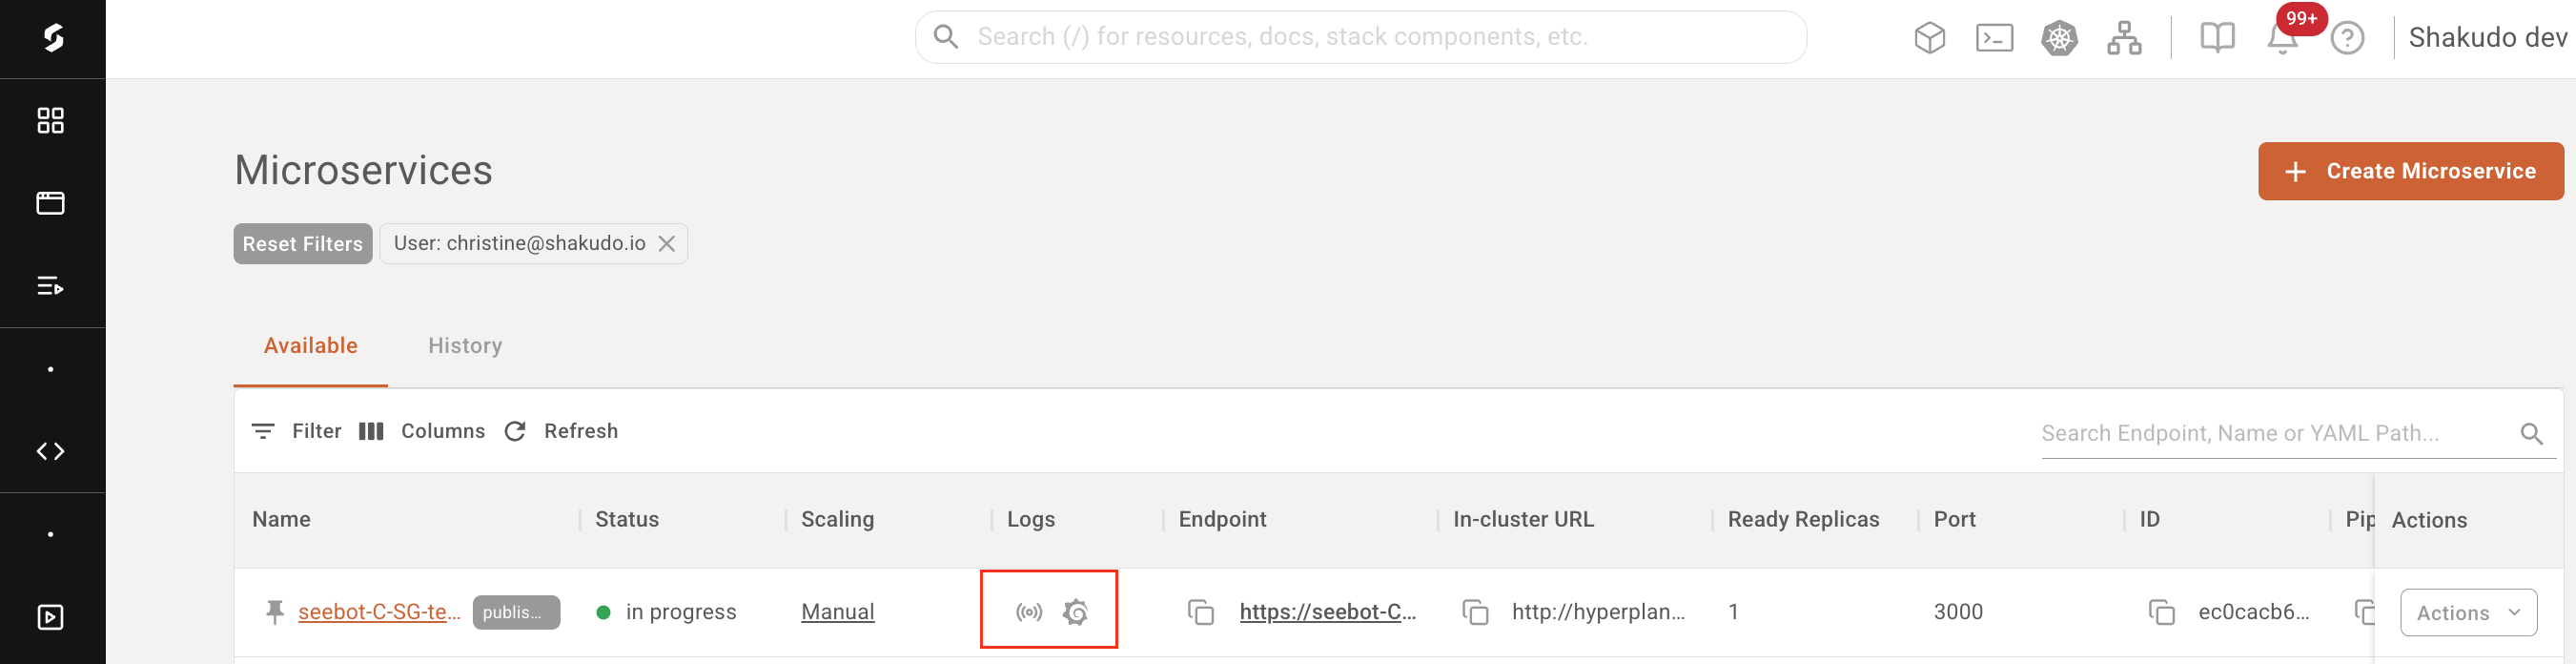
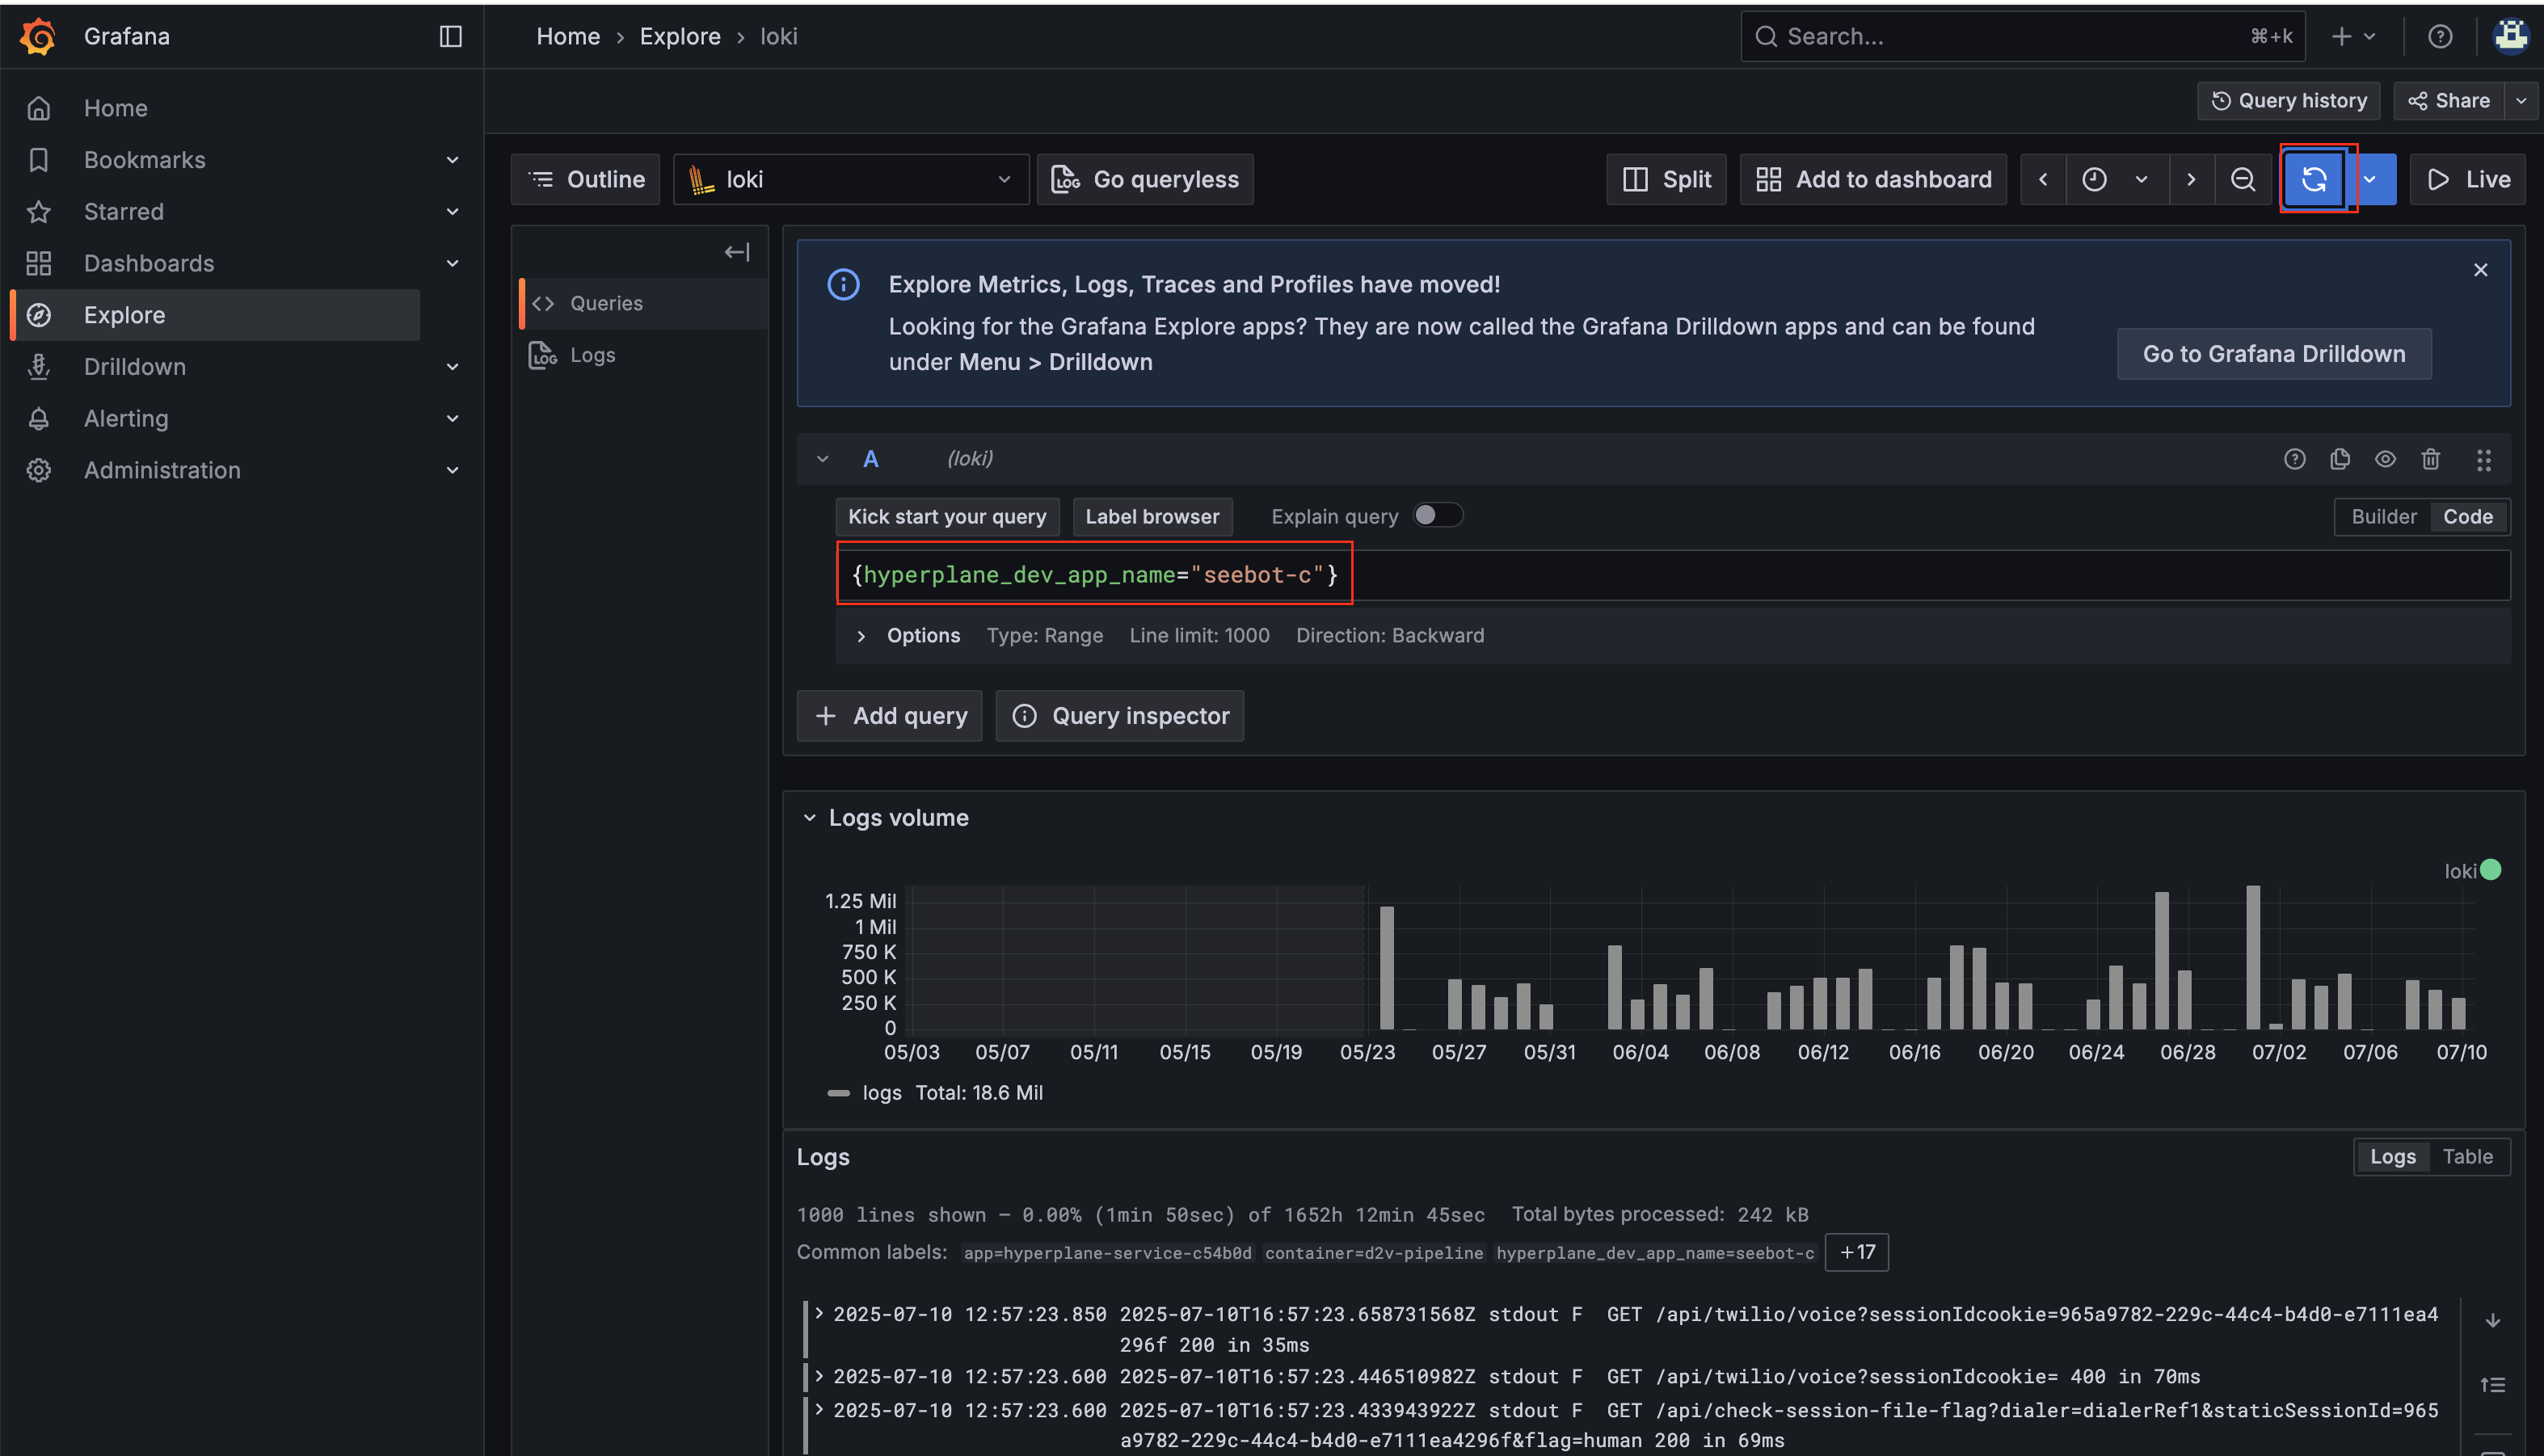
Logs and filtering
To view the live logs for a Microservice, go to the Microservices table view and select the logs icon for the live logs modal. If you would like to view historical logs, you can click the Grafana icon in the table entry.
The Grafana dashboard is automatically filtered for the Microservice by id. To see logs for a specific service name rather than id, you can use a filter like {hyperplane_dev_app_name="test-recycle"} in the Grafana dashboard.
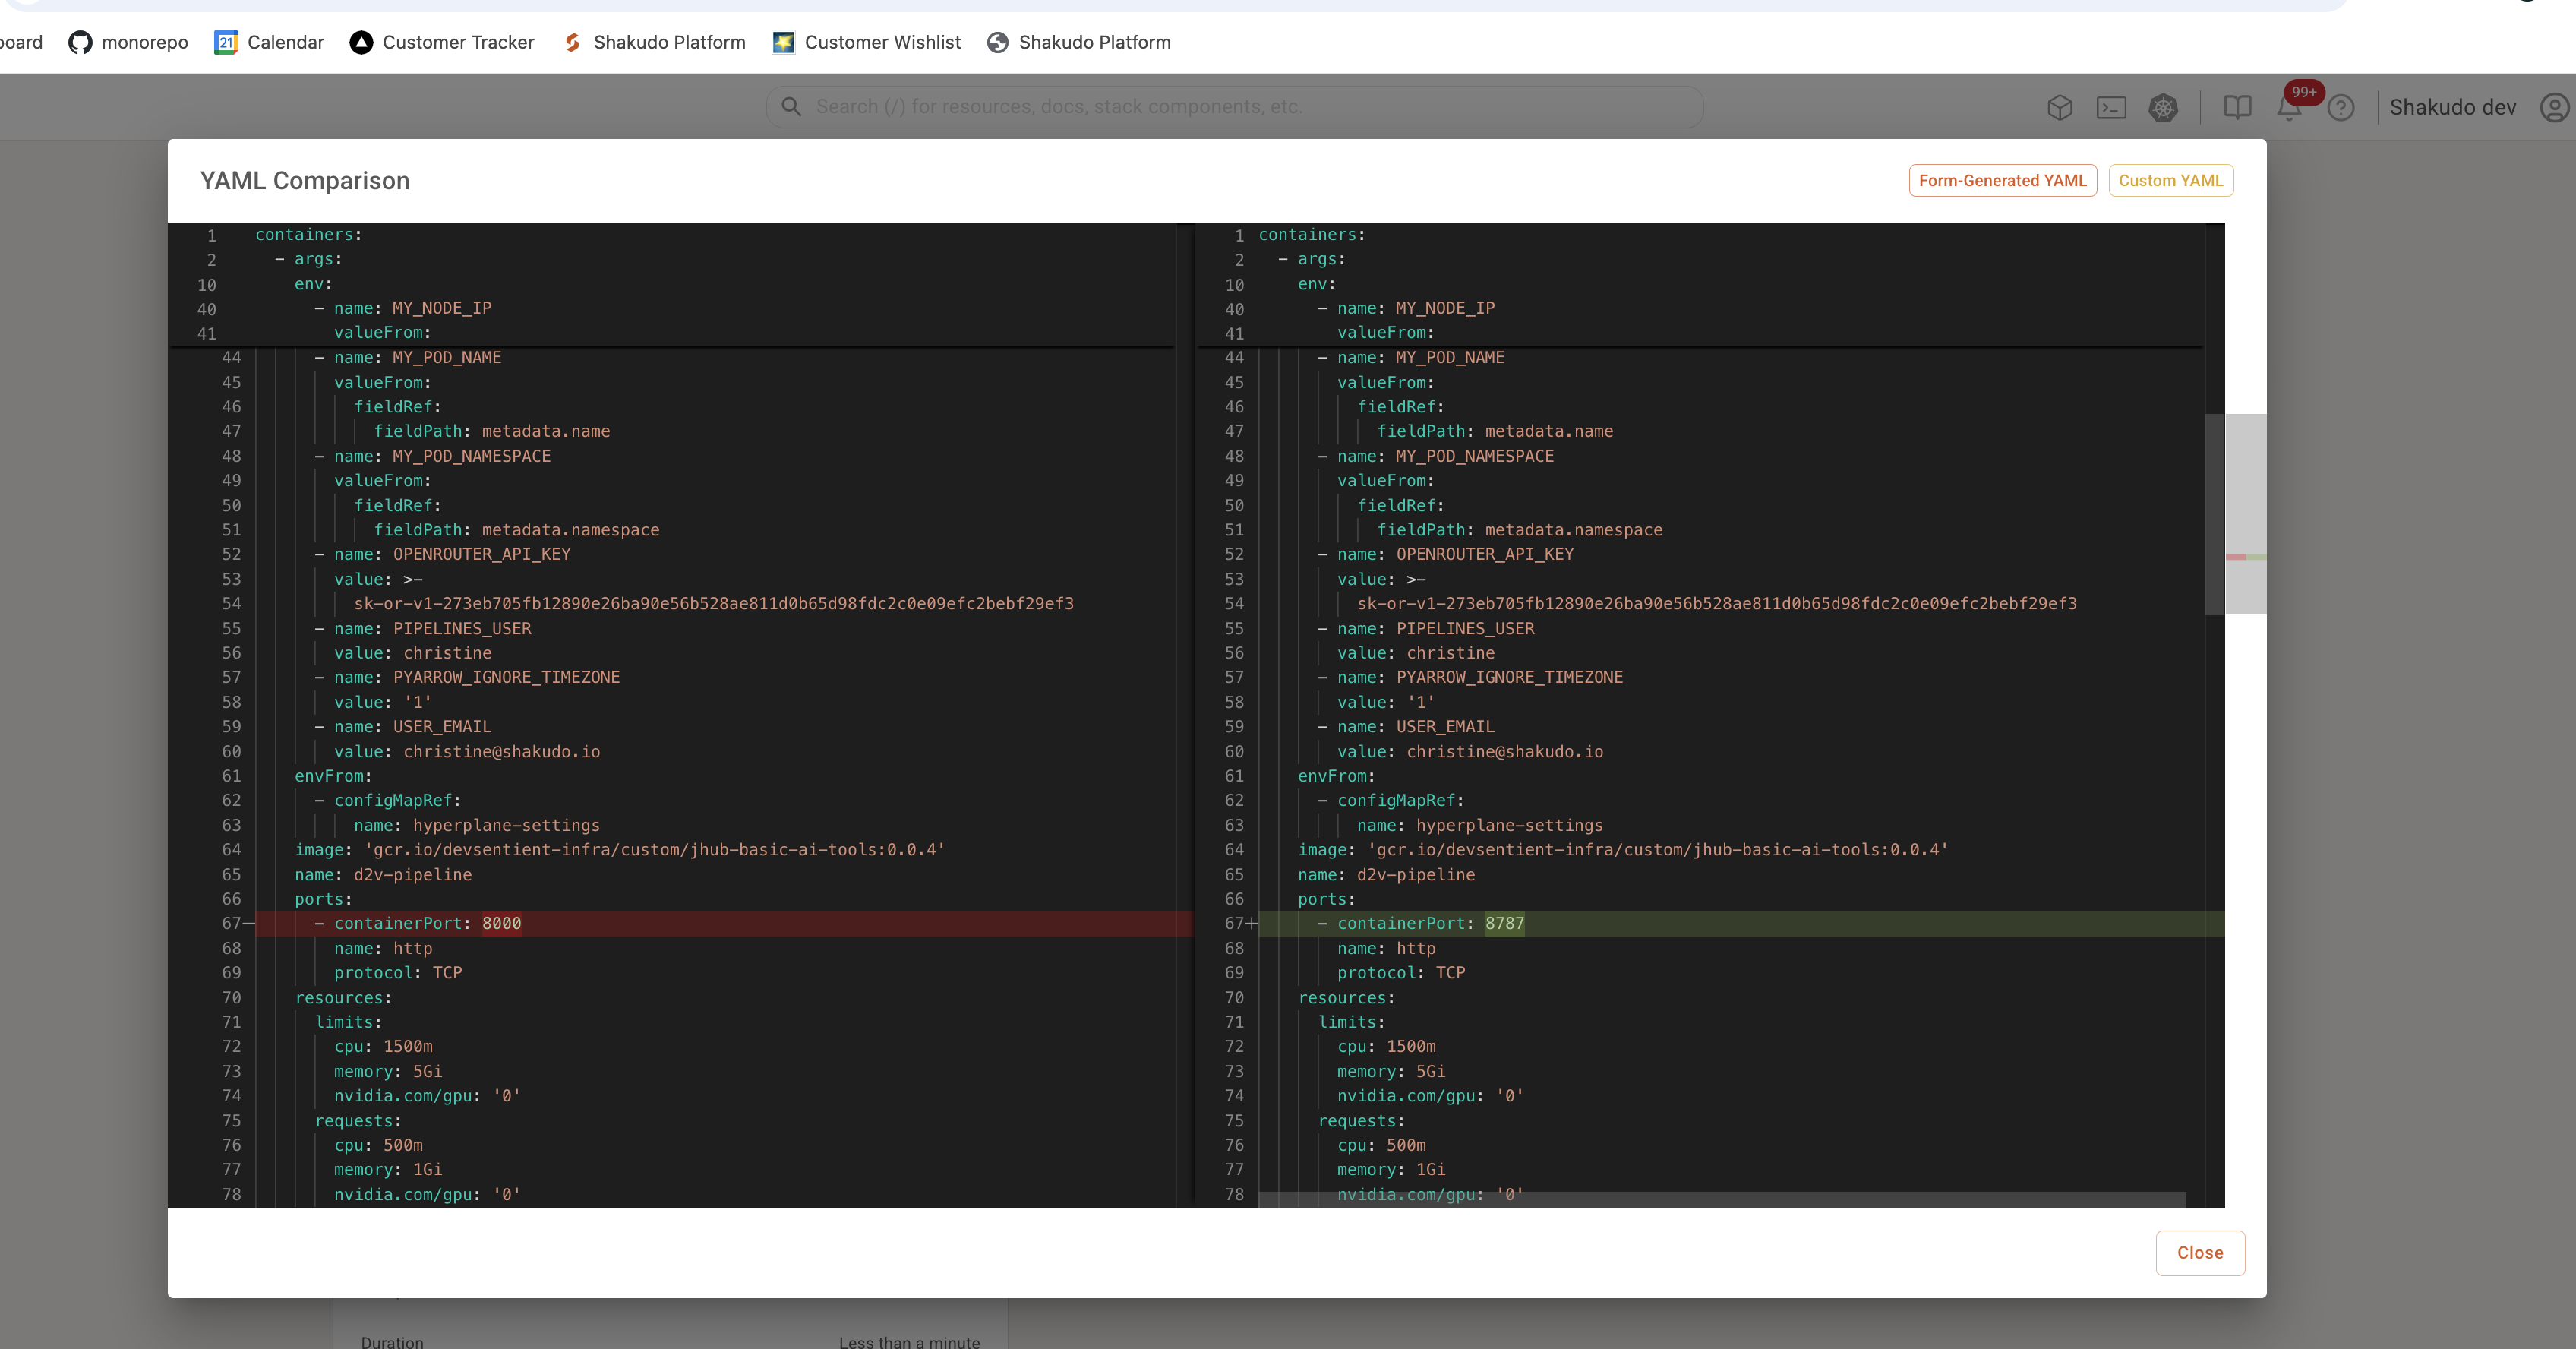
Customize Pod YAML
Customize Pod YAML is an option for advanced users who are familiar with Kubernetes and want to manipulate the specs of a Microservice at a more granular level. The screen starts off with the YAML generated from the Create a Microservice form, but you can edit any of the fields. There is a validation check to ensure that the fields are Kubernetes compatible.
For examples on specific ways to modify your custom YAMLs, see the tutorials here.
![]()
For previously-created services, if you want to compare the differences between the custom YAML used vs. the auto-generated YAML, you can click on the "Customized YAML" on the Microservice Details page to see a side-by-side comparison.
Service actions
The service actions menu can be used to operate on a current or past service.
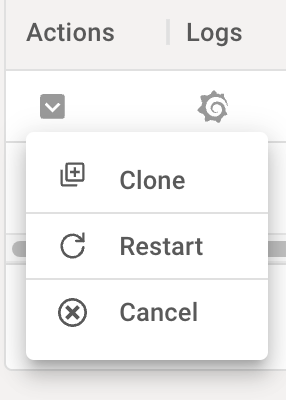
Cancel
A current service can be canceled by choosing the "cancel" action in the action menu.
Clone
A new service can be created based on the configuration of an existing service by choosing the "clone" action. This can also be used on past services that have been canceled to recreate a service of the same type, or to use the service settings as a template for faster iteration.
Restart
Restarting a service (which will cause it to pull from the associated repository as per its settings) can be done by selecting the "restart" action.
Edit
If you are on a version of Shakudo that supports editing Microservices and you have permissions to change a specific Microservice, you will see "Edit" in the dropdown. Editing most values, other than the README, will result in a microservice restart upon saving.
If your Shakudo version does not yet support a single-action update operation on Microservices, the recommended path to updating specific values are to first stop the existing service and then clone it, with an updated configuration. For updates to the service code from the associated repository which don't require configuration changes, the Microservice should be restarted with the restart action.
Accessing a service from outside the cluster
Creating webhooks using the Traffic Shifter is a standard way to expose a Shakudo Microservice publicly. However, if you prefer not to use webhooks, Microservices can be accessed externally using a JWT using the bearer method in the request headers.
- Prepare to make a
POSTrequest tohttps://{your_shakudo_domain}/auth/realms/Hyperplane/protocol/openid-connect/token, for example usingcurlorPostman{your_shakudo_domain}is the domain at which your Keycloak is available, which is usually the same domain at which you access your cluster running Shakudo
- Set the
Content-Typeheader toapplication/x-www-form-urlencoded - Set the following parameters in the request body:
client_id: the client used to get the token (should beistio)grant_type: value should bepasswordusername: Your usernamepassword: Your password
note
The Access Type must be public to obtain a JWT this way
The response JWT can then be used to access service endpoints: simply add Authorization: Bearer {token} to your Headers, with {token} being the JWT obtained in the previous step.
Note that in some Stack Components, the Authorization: header is needed to use credentials in requests, but in Shakudo, it is reserved for Keycloak. Therefore, if your application or Stack Component requires credentials in the form of an Authorization: header, you should pass the component-specific credentials into the x-custom-auth: header instead.
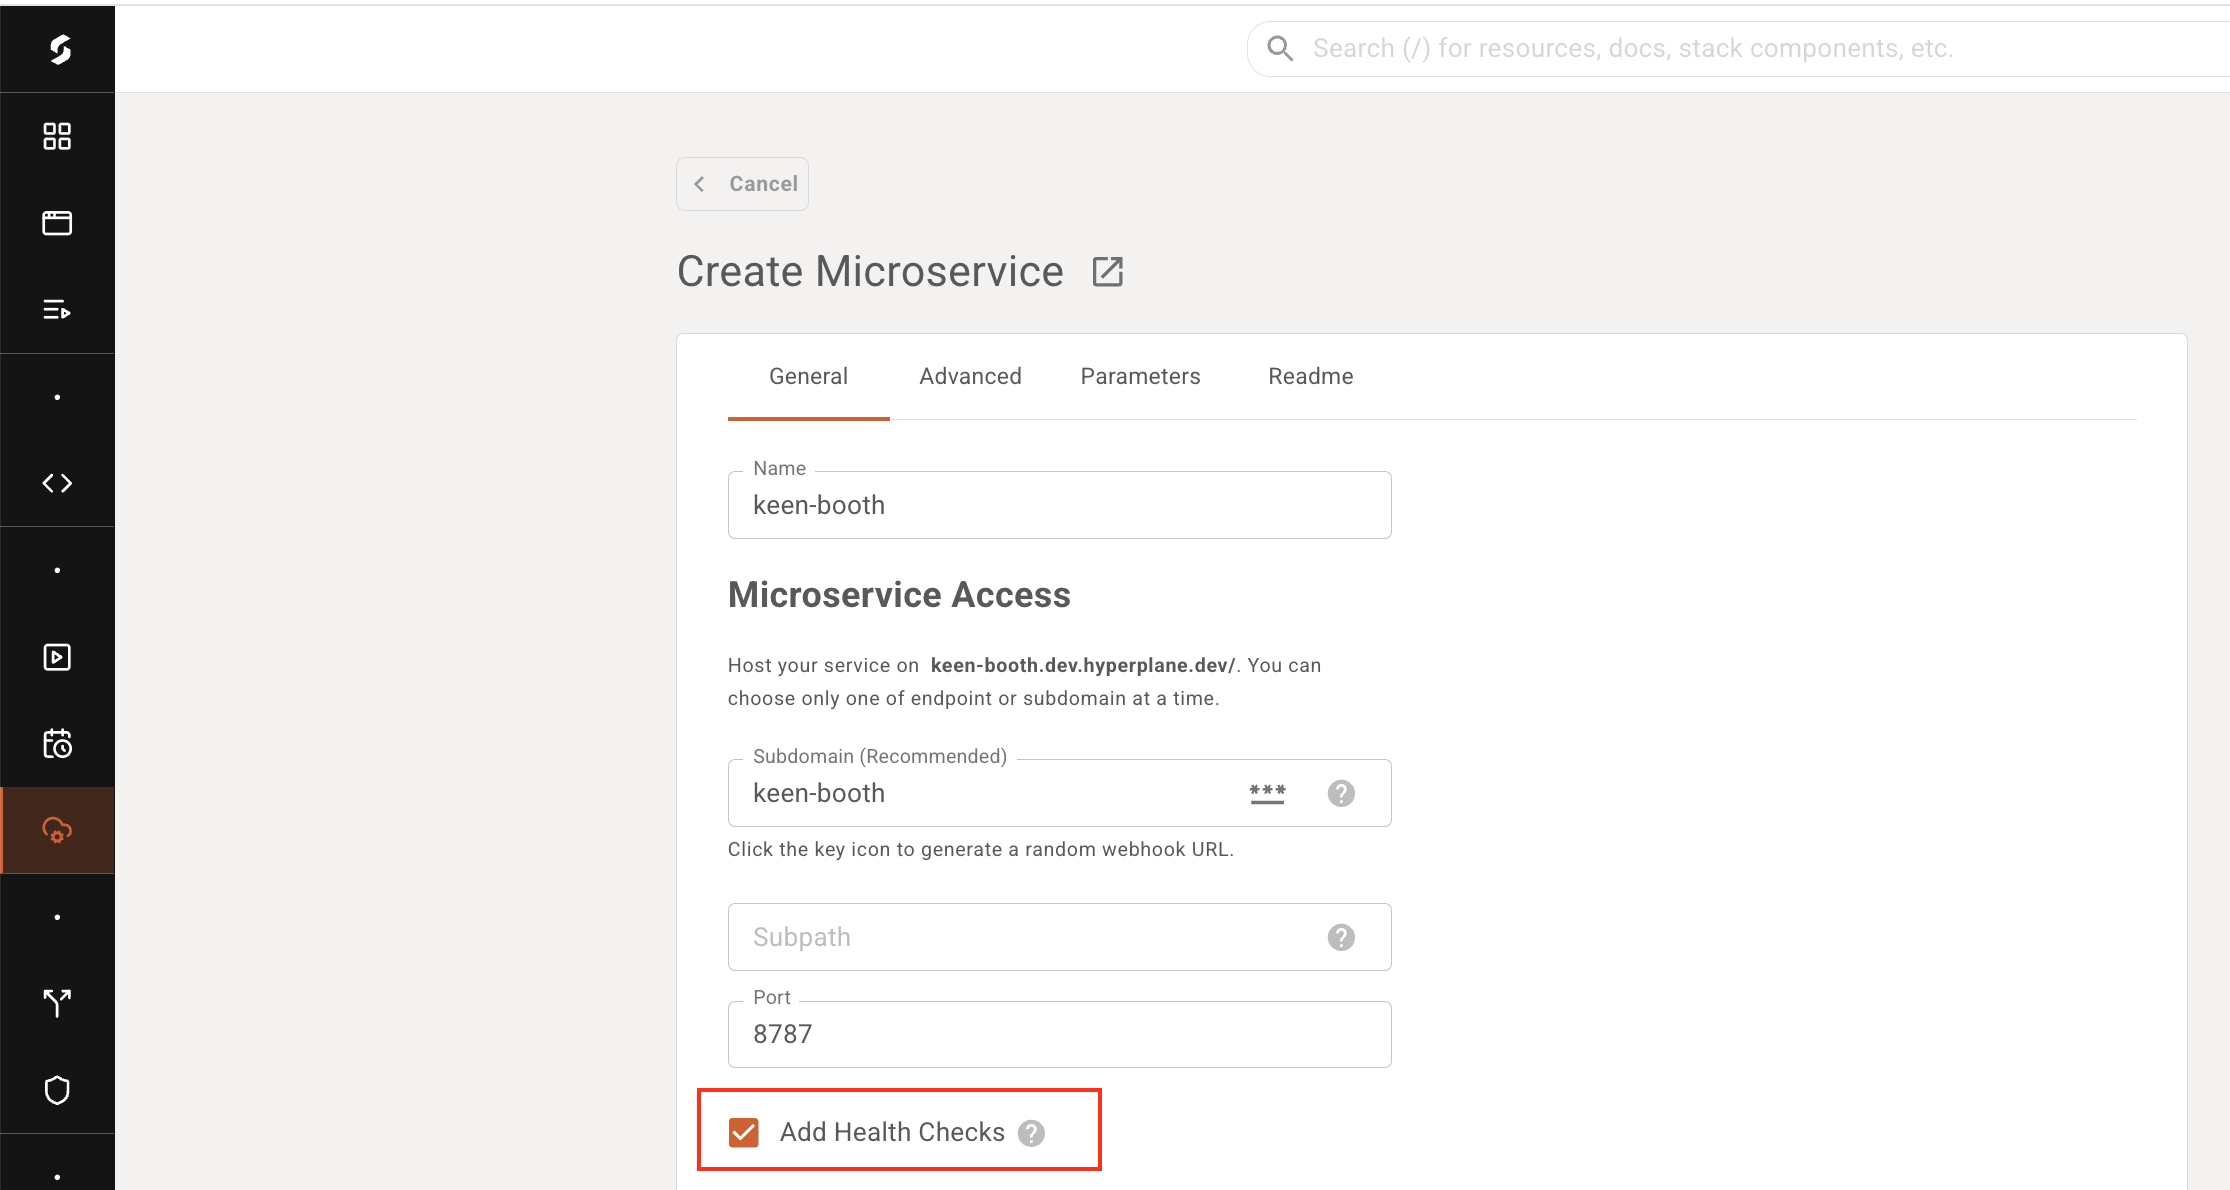
Health Check
Liveness and Readiness Probes
In versions v3.48.0 and later of Shakudo, you can enable "Health Probes" through the Microservice creation page. By default, enabling Health Probes through the dashboard adds a simple TCP socket probe, using the value in your exposedPort, to your Microservice:
    livenessProbe:
      tcpSocket:
        port: 8787
      initialDelaySeconds: 30
      periodSeconds: 10
      timeoutSeconds: 5
      failureThreshold: 3
    readinessProbe:
      tcpSocket:
        port: 8787
      initialDelaySeconds: 10
      periodSeconds: 5
      timeoutSeconds: 3
      failureThreshold: 3
If you wish to modify to a more advanced health probe, you can go to the Custom YAML panel to add further customizations. For example, to add a probe checking a /health endpoint, you can use the following:
    livenessProbe:
      httpGet:
        path: /healthz
        port: 8080
        httpHeaders:
        - name: Custom-Header
          value: Awesome
      initialDelaySeconds: 3
      periodSeconds: 3
For more options, refer to the Kubernetes official docs for probes.
Check All Services as an Admin
Once deployed, you can confirm the Microservice is healthy using the k9s or Cluster Shell (if you have a dashboard-admin role).
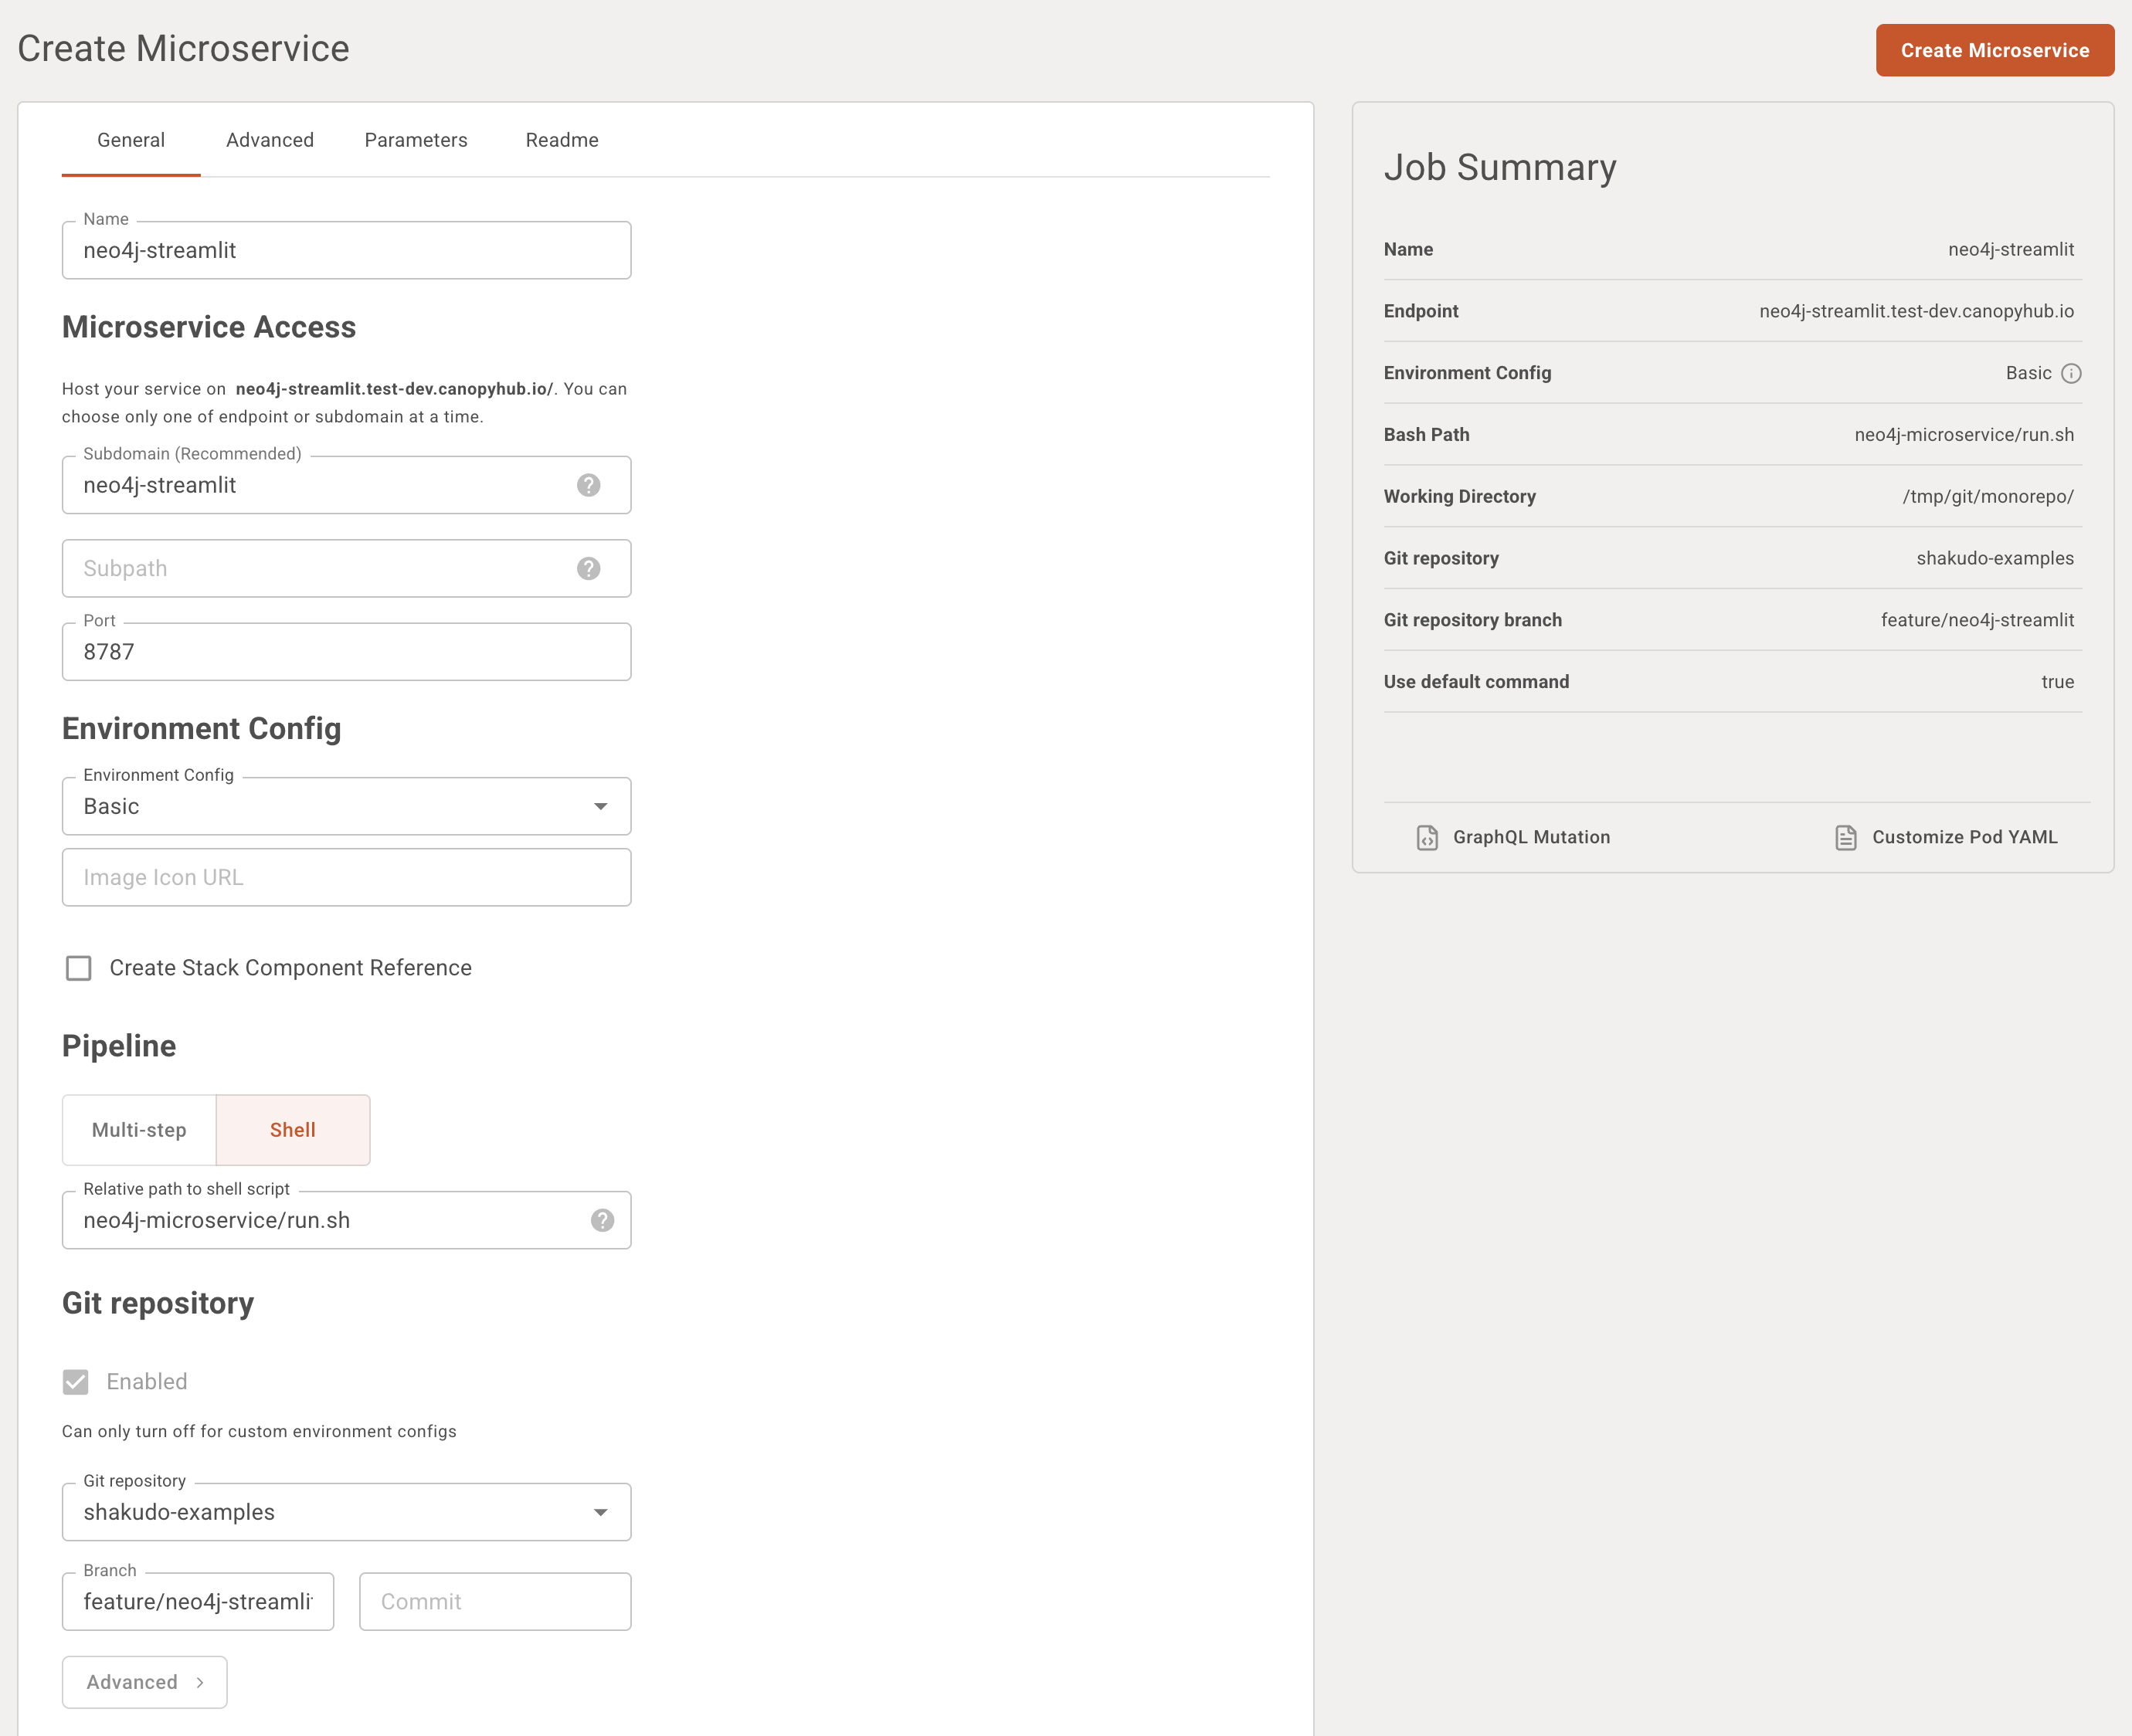
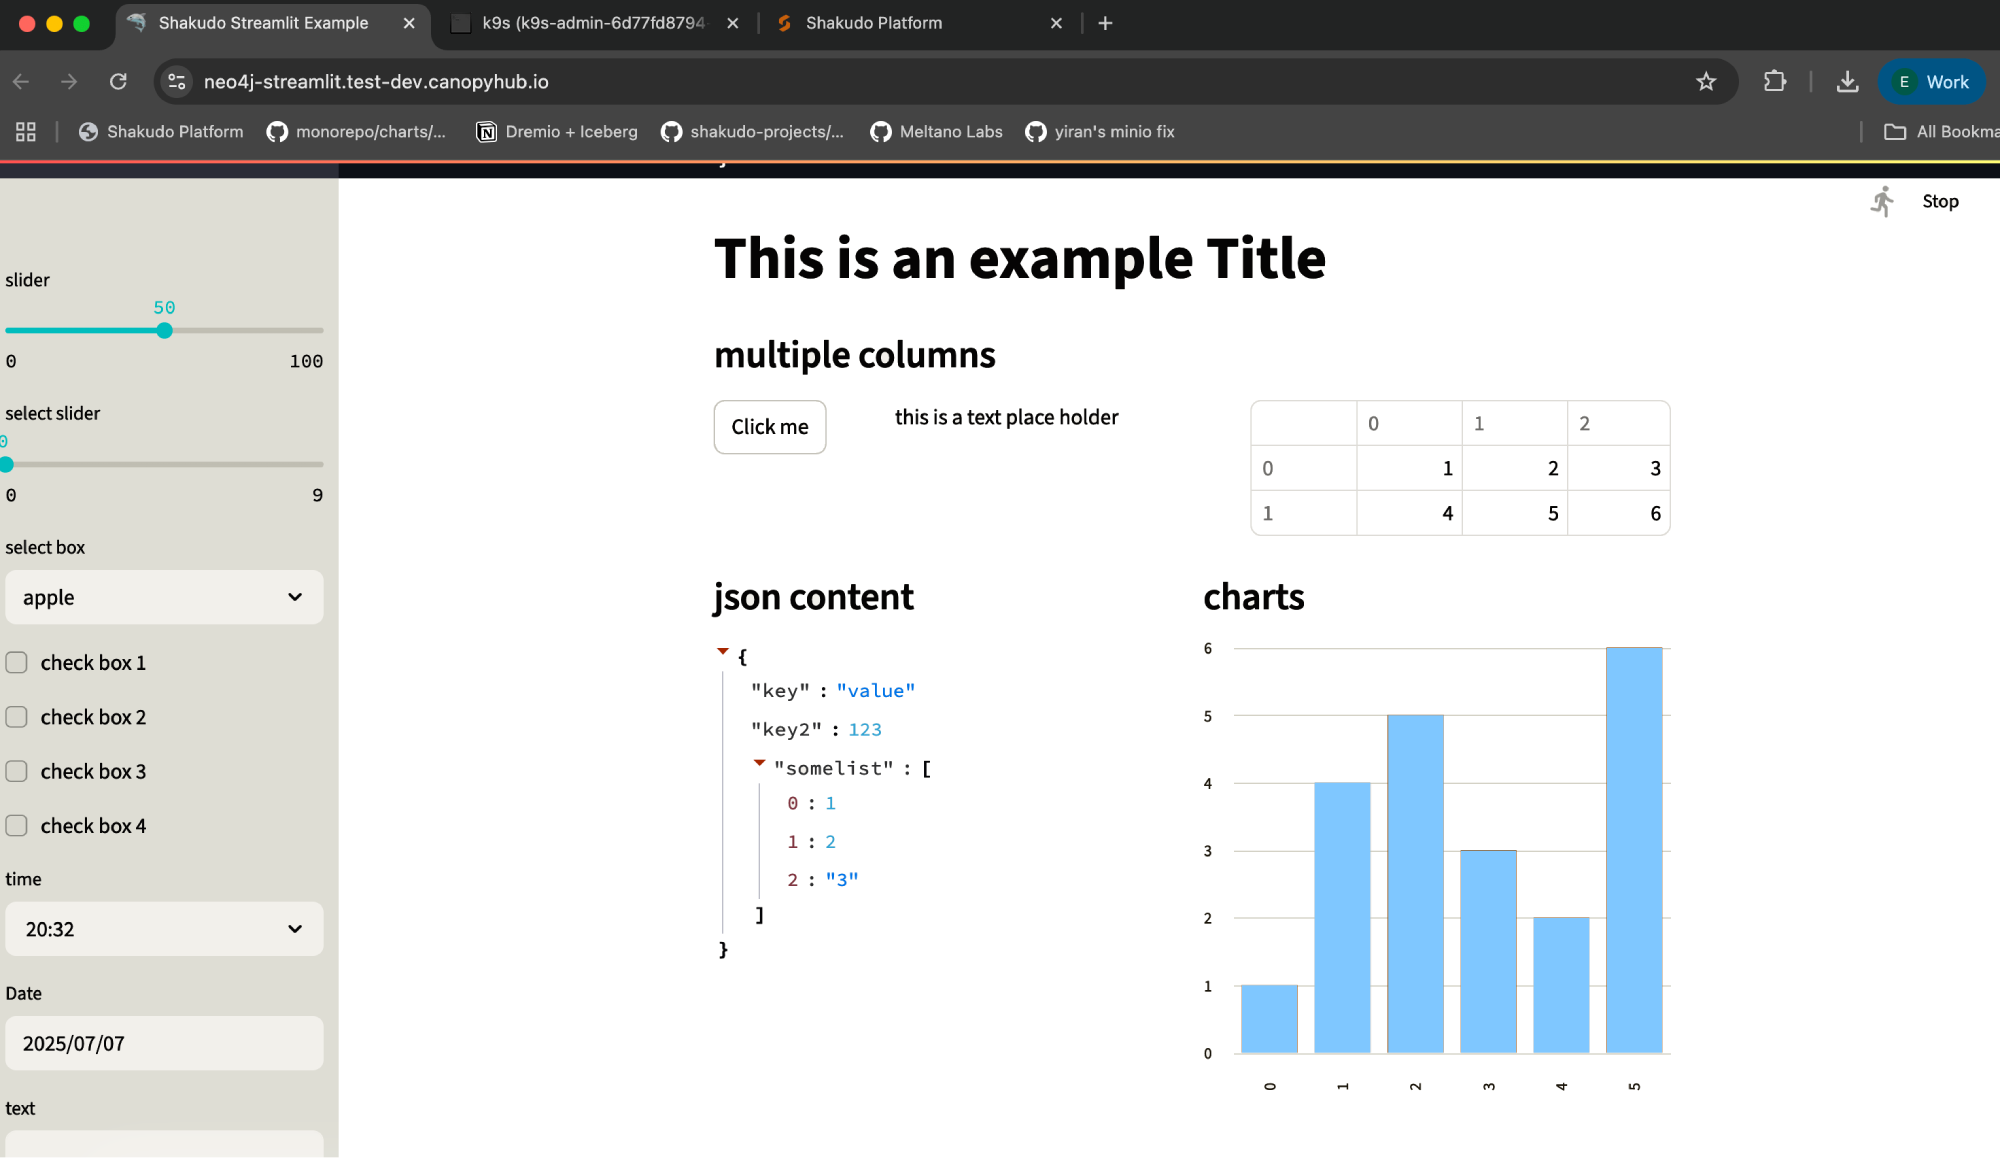
Example: Neo4j Streamlit Microservice
This example demonstrates how to deploy a simple Streamlit application that connects to a Neo4j database and provides a real-time query interface with the following features:
- Interactive frontend built with Streamlit
- Connects to Neo4j using the official Python driver
- Visualizes Cypher query results in an intuitive, user-friendly graph interface
- Fully configurable via environment variables (URI, user, password, etc.)
- Includes a setup and usage screen recording
Setup Instructions
Add the repository to your Shakudo workspace.
Create a new Microservice using either the landing page or the service dashboard.
Set Service Details:
Name your service:
Example:neo4j-streamlitSubdomain (optional but recommended):
Set it to match the name, e.g.neo4j-streamlit, which will expose the service at:
neo4j-streamlit.test-dev.canopyhub.ioPort:
Use the default port:8787Environment Config:
SelectBasic(or another appropriate Environment Config that includes Python)Pipeline:
Choose the Shell option
Provide the relative path to your shell script, for example:
neo4j-microservice/run.sh
This script should exist in your Git repository and be executable.Git Repository:
- Select repository:
shakudo-examples - Branch:
feature/neo4j-streamlit
- Select repository:
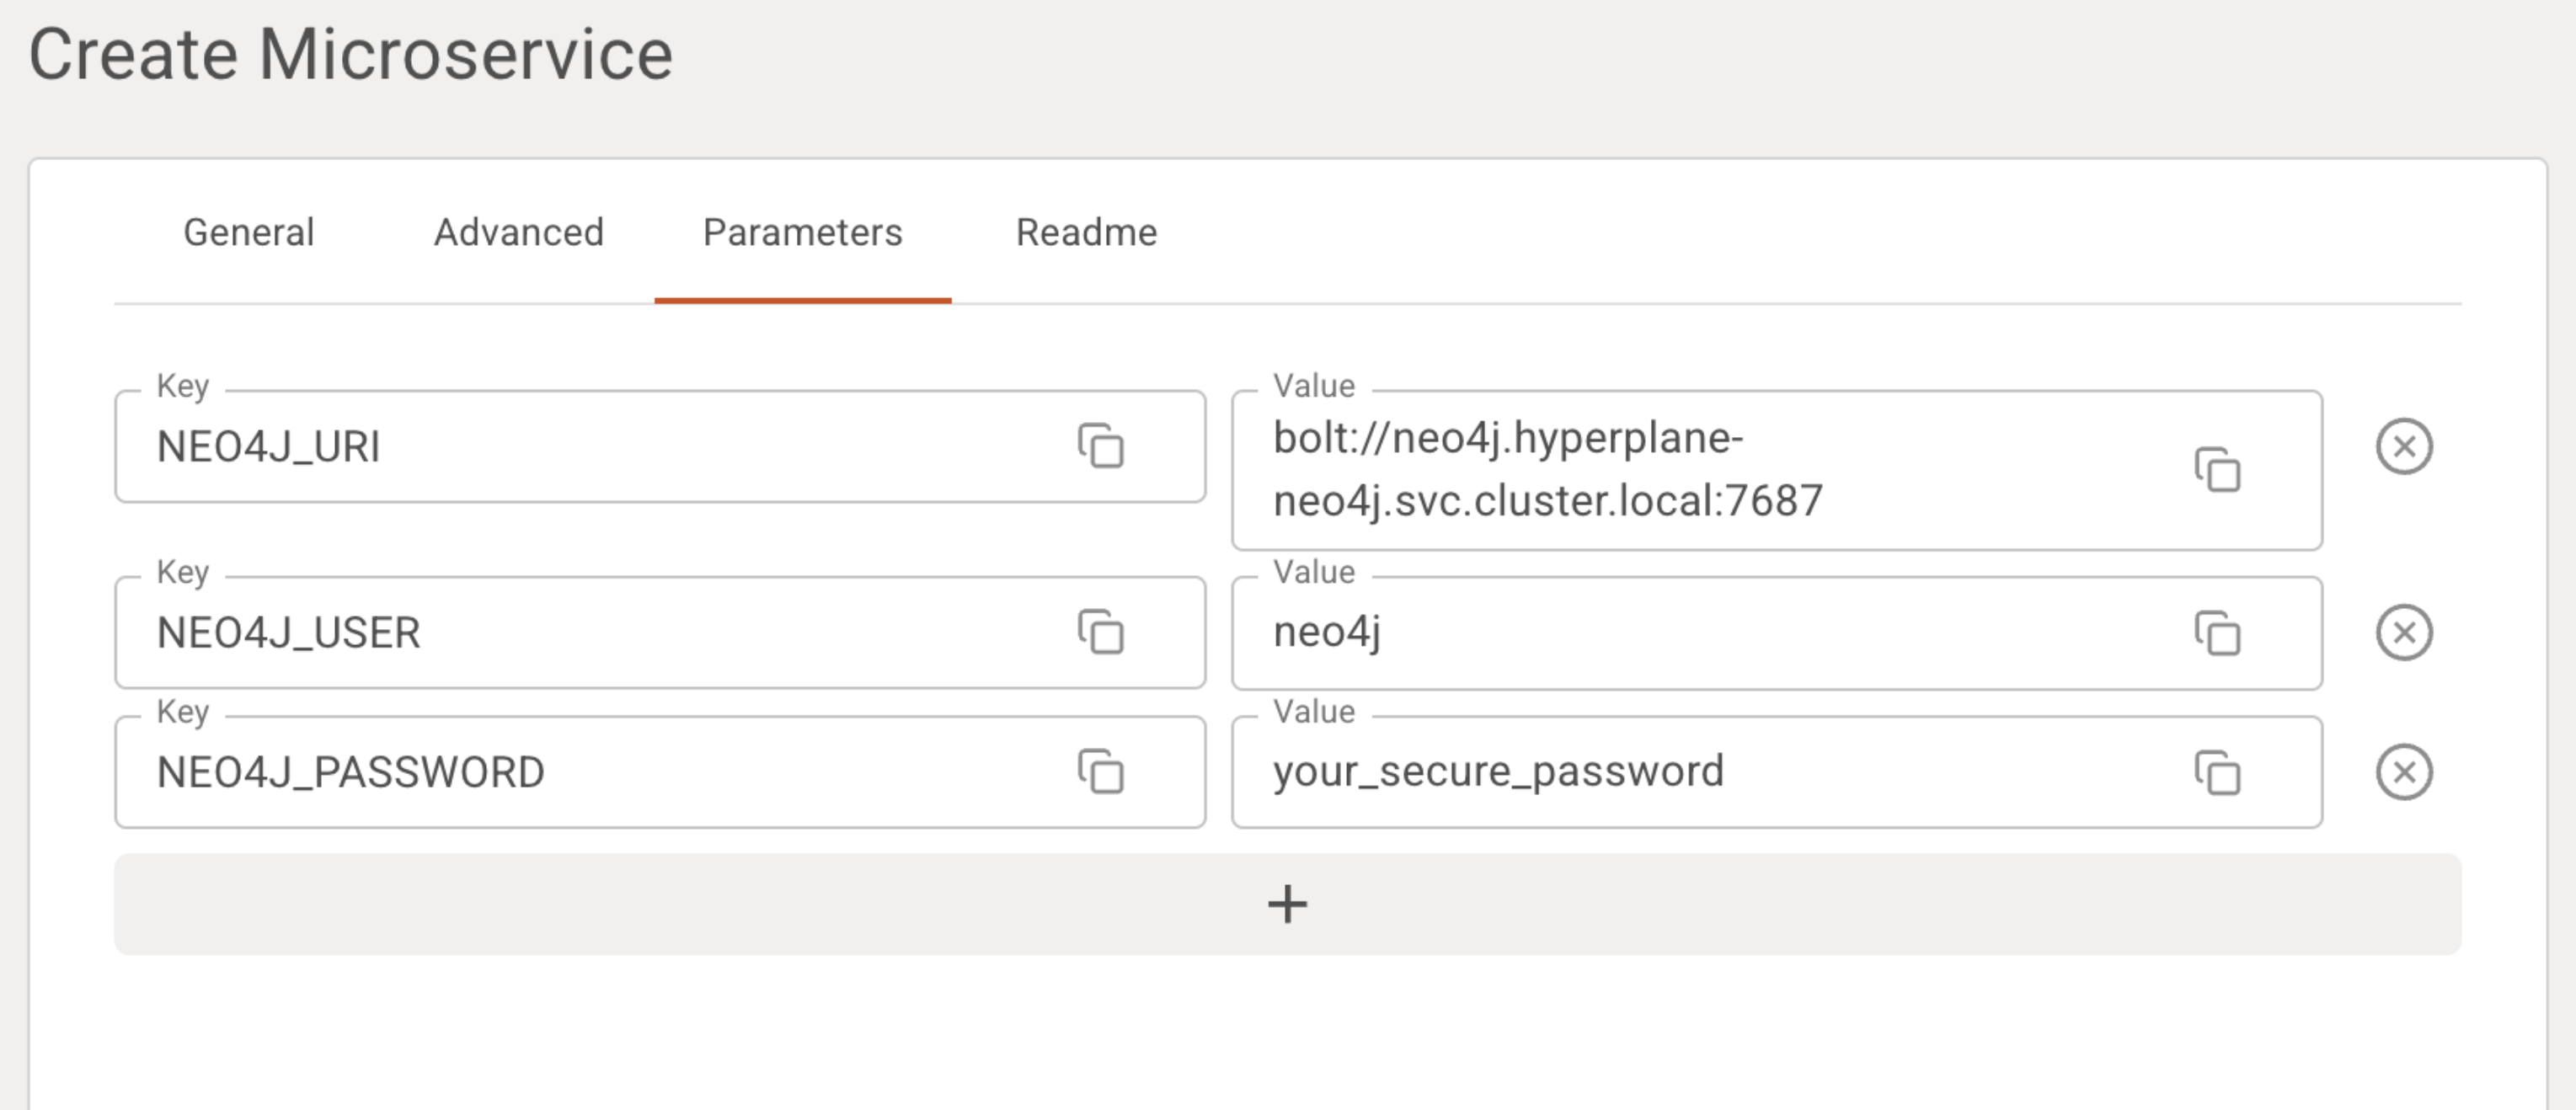
Parameters
Add the following Parameters (not Secrets unless sensitive):
| Parameter Name | Description | Example Value |
|---|---|---|
NEO4J_URI | Bolt connection URI for Neo4j | bolt://neo4j.hyperplane-neo4j.svc.cluster.local:7687 |
NEO4J_USER | Neo4j username | neo4j |
NEO4J_PASSWORD | Neo4j password | your_secure_password (use a Secret for real deployments) |
These will be available inside the service as environment variables:
e.g., NEO4J_URI, NEO4J_USER, NEO4J_PASSWORD
Streamlit app preview
Watch Setup Demo — Watch the setup demo here